Saturday, March 2, 2013
Browse »
home»
a
»
back
»
cheap
»
how
»
illuminated
»
led
»
light
»
make
»
name
»
plate
»
to
»
with
»
How to Make a Cheap LED Name Plate with Illuminated Back Light

How to Make a Cheap LED Name Plate with Illuminated Back Light
LEDs are no doubt gaining popularity by leaps and bounds and probably most of the illuminated decorative articles today incorporate LED as the light source. These devices are relatively cheap, extremely bright and outstandingly efficient with their operations.
Digital displays today also incorporate LED technology and we all know how impressive they look with the involved digits distinctly visible with an illuminated back light.
The back illumination especially gives a fuller look and helps to highlight the display in a better way.
However these displays can be pretty expensive and require microcontroller ICs for producing the involved illuminations. A new hobbyist may find it difficult to grasp and make such displays at home.
Using LEDs in series for designing alphanumerical displays consisting of the desired names and numbers looks good but these dont produce the effects which is generally obtained from a back illuminated displays.
A cheap way of making a back illuminated display or a name plate having the desired alphabets is explained here, lets see how we can implement the whole concept very cheaply.
For making the proposed back illuminated name plate circuit design we will basically require the following very few of the components.
Four high bright LEDs, color will depend on the user preference, I used blue LEDs in my prototype because my party wanted blue back light illumination for his displays.
A rectangular plastic lens, made up of acrylic material.
PCB as shown in the figure.
Positive film of the desired name or, a screen printed film with the name portion kept transparent while the rest of the area painted black and opaque.
150 Ohm resistor, 1 no.
Refer circuit diagram
How to Make the Display.
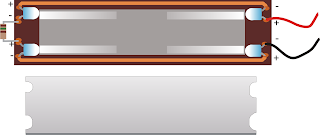
Connect the LEDs and the resistor as shown in the figure below such that the LEDs focus the light across the length of the rectangular PCB.
Cut the acrylic lens such that it perfectly fits in between the LEDs, make notches or grooves at the lens ends for making a snug fitting with the LEDs.
Now scratch one of the surfaces of the acrylic lens with a polish paper or an emery paper, such that it becomes rough and grainy on that surface and almost opaque for a clear vision, this operation is the secret behind producing a perfect and uniform back light.
Place a white paper cut to size on the PCB such that the light from the LEDs floods the white paper across the length.
Next place the lens in the center of the LED, over the PCB and the above white paper with its roughened surface on the top side.
Next place the positive film of the name display over the above lens.
Switch ON power to the LEDs, wow! your name plate is glowing bright with an illuminated back-light thats uniformly lit across the whole displayed name.
Put insulation tape over the side ends of the unit such that light does not escape from these areas.
Enclose the whole unit inside a suitable rectangular box for displaying it in the preferred location.
PCB, LED and the Lens Set Up


Positive placed over the lens for the final illuminated get-up:

Now some glimpses of the actual prototype:
First, the PCB/LED design:

Completed Prototype, Switched ON:
 In Dark:

Digital displays today also incorporate LED technology and we all know how impressive they look with the involved digits distinctly visible with an illuminated back light.
The back illumination especially gives a fuller look and helps to highlight the display in a better way.
However these displays can be pretty expensive and require microcontroller ICs for producing the involved illuminations. A new hobbyist may find it difficult to grasp and make such displays at home.
Using LEDs in series for designing alphanumerical displays consisting of the desired names and numbers looks good but these dont produce the effects which is generally obtained from a back illuminated displays.
A cheap way of making a back illuminated display or a name plate having the desired alphabets is explained here, lets see how we can implement the whole concept very cheaply.
For making the proposed back illuminated name plate circuit design we will basically require the following very few of the components.
Four high bright LEDs, color will depend on the user preference, I used blue LEDs in my prototype because my party wanted blue back light illumination for his displays.
A rectangular plastic lens, made up of acrylic material.
PCB as shown in the figure.
Positive film of the desired name or, a screen printed film with the name portion kept transparent while the rest of the area painted black and opaque.
150 Ohm resistor, 1 no.
Refer circuit diagram
How to Make the Display.
Connect the LEDs and the resistor as shown in the figure below such that the LEDs focus the light across the length of the rectangular PCB.
Cut the acrylic lens such that it perfectly fits in between the LEDs, make notches or grooves at the lens ends for making a snug fitting with the LEDs.
Now scratch one of the surfaces of the acrylic lens with a polish paper or an emery paper, such that it becomes rough and grainy on that surface and almost opaque for a clear vision, this operation is the secret behind producing a perfect and uniform back light.
Place a white paper cut to size on the PCB such that the light from the LEDs floods the white paper across the length.
Next place the lens in the center of the LED, over the PCB and the above white paper with its roughened surface on the top side.
Next place the positive film of the name display over the above lens.
Switch ON power to the LEDs, wow! your name plate is glowing bright with an illuminated back-light thats uniformly lit across the whole displayed name.
Put insulation tape over the side ends of the unit such that light does not escape from these areas.
Enclose the whole unit inside a suitable rectangular box for displaying it in the preferred location.
PCB, LED and the Lens Set Up
Lens Placed over the PCB
Example film positive of a particular display name:
Positive placed over the lens for the final illuminated get-up:
Now some glimpses of the actual prototype:
First, the PCB/LED design:
Completed Prototype, Switched ON:
Subscribe to:
Post Comments (Atom)
No comments:
Post a Comment
Note: Only a member of this blog may post a comment.